By Anna Tiburzi
Welcome back! Buckle up, we’re in for a long one.
We’ve reached the end of week seven, which is the lucky week that marks the very beginning of what will be a very back and forth transition period. Up until now, as you may have read in earlier posts, I’ve been pretty deeply entrenched in CAD files and SketchUp models, adding things in, smoothing oddities out, and setting them up for later tasks just in general. Modeling isn’t really fast work, but we’re finally reaching a transition stage – while I’ve been sort of swimming in the deep end of SketchUp up until now, I finally get to dip my toes in Lumion.
Lumion, for those who may not be familiar, is a rendering software. In it, I can import SketchUp models and start adding materials, modeled trees, and other elements that will start bringing the models to life. I can also set up scenes and begin to adjust effects like sun position and clouds, wind and weather, color and light.

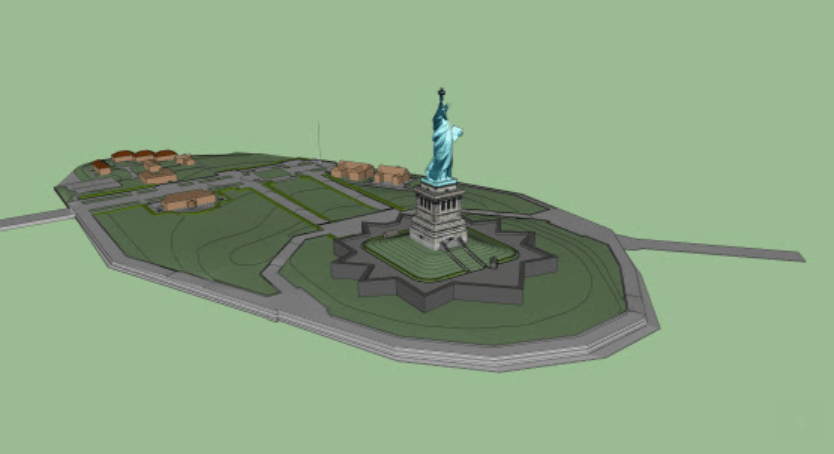
Figure 1: Original 1952 Model in SketchUp

Figure 2: Developed 1952 Model in SketchUp – terrain mesh smoothed and material applications underway
It’s not a clean transition from one program to the next, it never is. No matter how close you get the SketchUp model, once you get it into Lumion for further development, you always find things to go back and fix or change. Things you missed or things you didn’t even think of now seem to be obviously missing. As I continue to find and receive new information about materials, buildings, and vegetation, it becomes a pattern of bouncing between the two programs.
For example, if I can get information on what species each tree is, I can place those species in Lumion and get the model that much closer to what it is or was. We already have some idea of tree sizes and/or diameters from existing plans and the original SketchUp models – you may have remembered those white cylinders in pictures in my last post, they act as placeholder guides to give me an idea of heights and locations now that I’m in Lumion. That might seem like a lot of detail, but the character of a tree can sometimes have a lot of impact on a scene and the opportunity to really get the sense of place right – or really throw the viewer off if they know it’s wrong, so it really makes a difference if we can get as many details correct as we can.

Figure 3: 1952 model exported in Lumion, in workspace

Figure 4: 1952 model, in-progress
Only the 1952 model has been brought into Lumion so far. The work that needs to be done in SketchUp isn’t over yet, there’s elements here and there that I still need to model, including the fort entrance and that tricky seawall – though I have a plan for both of those. I’m learning more about materials every day, going back and adding lines to differentiate areas so I can add separate materials back in Lumion.
I’ve also begun setting up those vantages that I discussed in Post 1. Once I’ve gotten them squared away in the 1952 model, I can replace and import the other models into the 1952 model’s place and save them as their own files so all those scenes and vantages I set up will be preserved across all 6 models again, recreating those repeat photography images we’re striving for. But I’m not really ready to start swapping out models yet, the work I’m doing in 1952 still has a ways to go.
If you’re wondering why the 1952 model gets the special treatment as the Lumion guinea pig, I don’t have a great answer except it happened to be the furthest along at the moment I needed one to be ready. I needed to run some test renders and try some things out and the other five just weren’t anywhere close to being ready enough for me to pull a convincing scene from them.
Here I’ve included these two test renders, done in different views and styles, rendered in Lumion and processed in Adobe Photoshop. You can tell we’re not fully ready yet to be moving on from SketchUp – the fort is missing its coping stones, the buildings are still sort of nondescript, the trees are generic placeholders, the materials aren’t quite right – and that’s just what you can see from the viewpoints I’ve selected – but it’s obvious we’re really starting to get somewhere and these images make it possible to open a dialogue for others on the Liberty team to respond and react to as we move forward.

Figure 5: 1952 Test Render A

Figure 6: 1952 Test Render B

Figure 7: Sample video render of an early and in-progress 1952 Lumion model
Liberty Island Site Visit
As you can probably tell by now, I’ve dedicated a lot of time to the models, becoming familiar with them, working on their meshes, adding materials, putting in walls and steps…it goes on. I like to joke sometimes that I live in the models, or I’m at least a very frequent tourist, made slightly ironic by the fact that I’ve never actually been to Liberty Island in reality, never actually seen Liberty herself up close.
This week, not only did we rectify that, but I got to do something only a fraction of Liberty’s daily visitors get to do – I was going up in the crown.
I arrived in NYC late Monday afternoon. Joining me from Syracuse, NY was my mentor on the project, Professor Aidan Ackerman (SUNY ESF) and, from the OCLP office in Boston, Eliot Foulds and Julia Miller. My evening was free and, already having confirmed our meeting time tomorrow morning with the others, I decided to walk down to Battery Park, where I got my first glimpse on the trip of Liberty herself.

Figure 8: View of Liberty from Battle Park, NYC
View of Liberty from Battery Park, NYC
Having grown up in Westchester County, I’ve been a frequent visitor to New York City throughout my life, but I’ve never stayed the night, so this was my first opportunity to wake up in Manhattan surrounded by skyscraper after skyscraper. It’s a view you can really appreciate any day, any time – which is good, because it was 5:30 am and I was due in the lobby in just over an hour. I got dressed and hit a cafe on the corner for breakfast and a very necessary coffee. No one’s ever accused me of being a morning person.

Figure 9: View from my hotel room up on the 42nd floor
We boarded the 7:30 am ferry to the island. Just us and park staff, we had our pick of seats and amazing views of the skyline as we pulled away from Battery Park.

Figure 10: Looking back at the Manhattan skyline as we ride the ferry to Liberty Island

Figure 11: Rounding the edge of the island
The first public ferry doesn’t leave until 8am, so Liberty Island is quiet and almost serene in the morning sun. We’re not alone though, we’ve got some park staff with us, including Superintendent of Liberty Island, John Piltzecker.

Figure 12: The view as you approach Liberty
The entrance to the 11-point fort is massive – that’s a lot of granite blocks – and a welcome sight. I’d been frustrated trying to add the missing entrance to the 6 models, not having found enough information to satisfy me. Now that I’ve got some pictures and measurements to work with, I can start developing them when I get back to Syracuse.

Figure 13: The entrance to the star fort, which is still missing from each of the 6 models
Walking through the doors brings you into the pedestal lobby where Liberty’s original torch used to sit before it was moved into the new Visitor’s Center and Museum on the other side of the island. We went up a flight to the second floor of the fort and walked around before loading into the elevator which would take us up to the top of the pedestal. There’s no elevator in the statue itself, so from pedestal to crown, we’re on our own.

Figure 14: The double-helix staircase
Liberty’s staircase is a double-helix which rises straight up from pedestal to crown. The clearance in the helix is just over 6 feet, with a width of less than 20 inches. Made of relatively thin copper sheets with steel armature, it’s not exactly comfortable in Liberty. Each step is 9″ in height and 8″ wide – and there’s over 160 of them in the double helix alone.

Figure 15: The view from the crown
It’s a relief to finally take the last step onto the final landing. It’s not exactly a cool day out and so it’s definitely hot up there, but the view is beautiful and it’s the crown, so a little heat is worth it. The first public ferry is still working its way over to Liberty Island so we have some time to ourselves before other visitors bearing crown tickets even take a step onto the island. We hang out up there for about a half an hour, talking with the NPS staff who came up with us, asking them questions and discussing the island, the statue, and our projects.

Figure 16: Here I am (in my new ACE shirt) nestled in Liberty’s crown

Figure 17: If I look a little warm, here’s why. It’s a little toasty in the copper statue
We learn a lot, including why you can’t go any higher than the crown – and, for most, you wouldn’t really want to. While the double-helix staircase isn’t exactly a party, access to the torch is actually made by climbing onto a platform near Liberty’s shoulder and ascending a near vertical ladder which terminates in a manhole-like exit out onto the torch.

Figure 18: The view of the torch from the crown
At some point, we do have to come down, there’s work to be done. On our way down we explore the pedestal and terreplein. I’ve got a whole list of images I’d like to take for modeling later and measurements I want to grab for reference. I’m collecting pictures of materials, dimensions, vegetation, and skylines and getting a much better feel for the island’s scale and spatial relationships overall.

Figure 19: View of Liberty from the base of her pedestal

Figure 20: Looking over the new terreplein towards the new visitor center
We visited the new Visitor’s Center and Museum, where the original torch stands on display. It looks very different from the one Liberty currently holds, but the newer torch is actually much truer to Liberty’s original design by Bartholdi.

Figure 21: The original torch
Wrapping up on Liberty Island, we headed to Ellis Island – another place I’d never visited. We got to tour the old buildings, hard hats and all, and see areas like the quarantine wards, doctors’ residences, and morgue. Not immediately relevant in my modeling but it’s always a good idea to get an idea of the relationships between places and the character of related spaces, as well as what Liberty Island looks like from various perspectives. It’s all good information.
At some point, the day does come to a close and my feet are grateful. Armed with pictures, measurements, and a greater understanding of the island itself, it’s time to go back home.
If you made it all the way to the end of this lengthy post, thanks for staying, there’s more to come soon!